Description
Looking for an easy, sourdough starter recipe for beginners? Adapted from my bestselling book Artisan Sourdough Made Simple, follow my no-nonsense guide for practical tips, tricks, and ongoing care- anyone can do it.
Ingredients
Note: Once your starter is established, use it to make my sourdough bread.
- 1x (5lb) bag all purpose flour or bread flour (I use either KAF, Trader Joe’s, or Whole Foods)
- 1/2 cup (60g) whole wheat flour (I use KAF whole wheat)
- Water (preferably warm around 85F )
Tips:
- The overall process typically takes 7 days, if the temperature is warm enough, ideally 75+ F. However, it can take up to 2 weeks or more for a strong starter to become established. Please be patient. Find a warm spot for your starter to rise (see tip in recipe below), and use warm water in your feedings if necessary to give the fermentation a boost.
- Only a small amount of whole wheat flour is used to jumpstart the fermentation process. If you don’t want to commit to a large bag, smaller bags are available in most grocery stores. Alternatively, you can use all purpose flour only.
- You will also need one large 3/4 L jar, or something of similar size (I use this one.).
Instructions
Before you begin: Establish a feeding schedule. In other words, feed your starter at the same time each day. This will establish consistency, which sourdough starters love. Consider feeding your starter in the morning when you wake up.
Day 1: Combine 60 g (1⁄2 cup) of whole wheat flour and 60 g (1⁄4 cup) of warm water in a large jar. Mix with a fork until smooth; the consistency will be thick and pasty. If measuring by volume, add more water to slightly thin out the texture if necessary. Cover with plastic wrap, reusable wax wrap, or a lid and let it rest in a warm spot, about 75-80 F, for 24 hours. Temperature is important.
TIP: Looking for a warm spot? Place your starter on a cookie sheet inside the oven (turned off) with the light on for an hour or two (it can get hot in there, so keep you eye on it!). Center rack is best. You can also use a proofing box set to your desired temperature, or a microwave with the door ajar and light on.
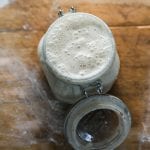
Day 2: Check to see if any bubbles have appeared on the surface. If you don’t see anything, it’s okay. The bubbles might have appeared and dissolved overnight while you were sleeping. You don’t have to do anything else now. Rest the starter for another 24 hours.
TIP: During the creation process, and even after your starter has been established, a dark liquid might appear on the surface and throughout the culture. It has a very stinky smell, similar to rubbing alcohol or gym socks. This liquid is called “hooch” and is an indication that your starter needs to be fed. It’s normal. Any time you see this liquid, it’s best to remove it along with any discolored starter present. However, on Day 2 just leave the hooch alone. You can remove it tomorrow when you start the feedings.
Day 3: Remove and discard approximately half of your starter from the jar (you should have 60 g left). The texture will be very stretchy. Add 60 g (1⁄2 cup) of all-purpose flour and 60 g (1/4 cup) of warm water to the jar. Mix with a fork until smooth. The texture should resemble thick pancake batter or plain yogurt at this point. Cover and let rest in your warm spot for another 24 hours.
As the yeast begins to develop, your starter will rise, and bubbles will form on the surface and throughout the culture. When the starter falls, it’s time to feed it again. TIP: Place a rubber band or piece of masking tape around the jar to measure the starter’s growth as it rises.
At a glance, your overall daily schedule with measurements should look like this:
- Day 1: 60 g flour + 60 g water = 120 g starter
- Day 2: Do nothing
- Day 3: Remove & discard half of the starter/ 60 g starter + 60 g flour + 60 g water = 180 g starter
- Day 4: Remove & discard half of the starter/ 90 g starter + 60 g flour + 60 g water = 210 g starter
- Day 5: Remove & discard half of the starter/ 105 g starter + 60 g flour + 60 g water = 225 g starter
- Day 6: Remove & discard half of the starter/ 112.2 g starter + 60 g flour + 60 g water = 232.5 g starter
- Day 7: Remove & discard half of the starter/ 116.25 g starter + 60 g flour + 60 g water = 236.27 g starter
Wondering if your starter is ready to use?
When your starter is fully active, do the float test. Feed your starter, wait for it to double in size, and then drop a teaspoon of bubbly starter into a jar of water; if it floats to the top it’s ready to use.
Storage Options
If you bake often, store your starter at room temperature (feed it 1x-2x a day to keep it active). If you plan to bake only once in a while, store it in the fridge to preserve its strength (feed it 1x a week). When storing your starter in the fridge, there’s no need to bring it to room temperature first before feeding it. Just give it some flour and water and pop it back in the fridge.