This chocolate sourdough bread recipe ticks all the boxes: soft, chewy and full of incredible chocolate flavor! It uses active sourdough starter to naturally leaven the dough, which comes together by hand in under 10 minutes.

Chocolate Sourdough Bread: could there be a better combination?!
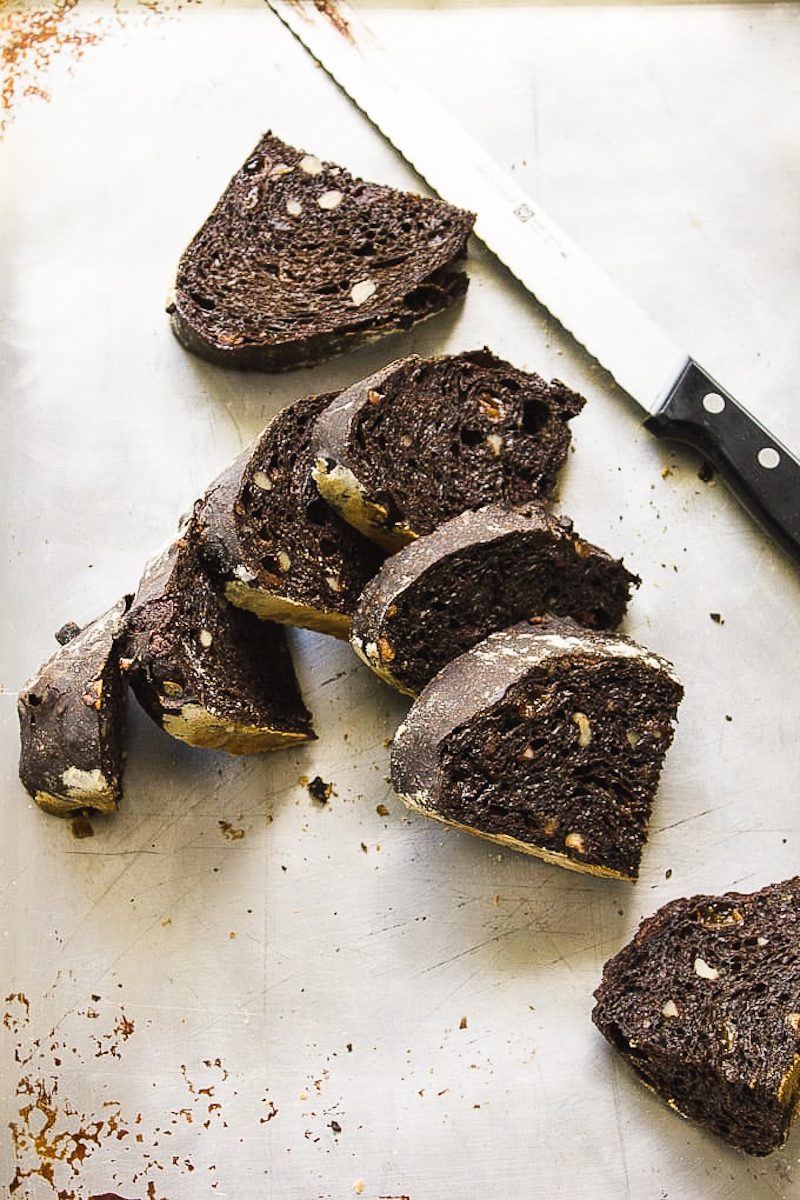
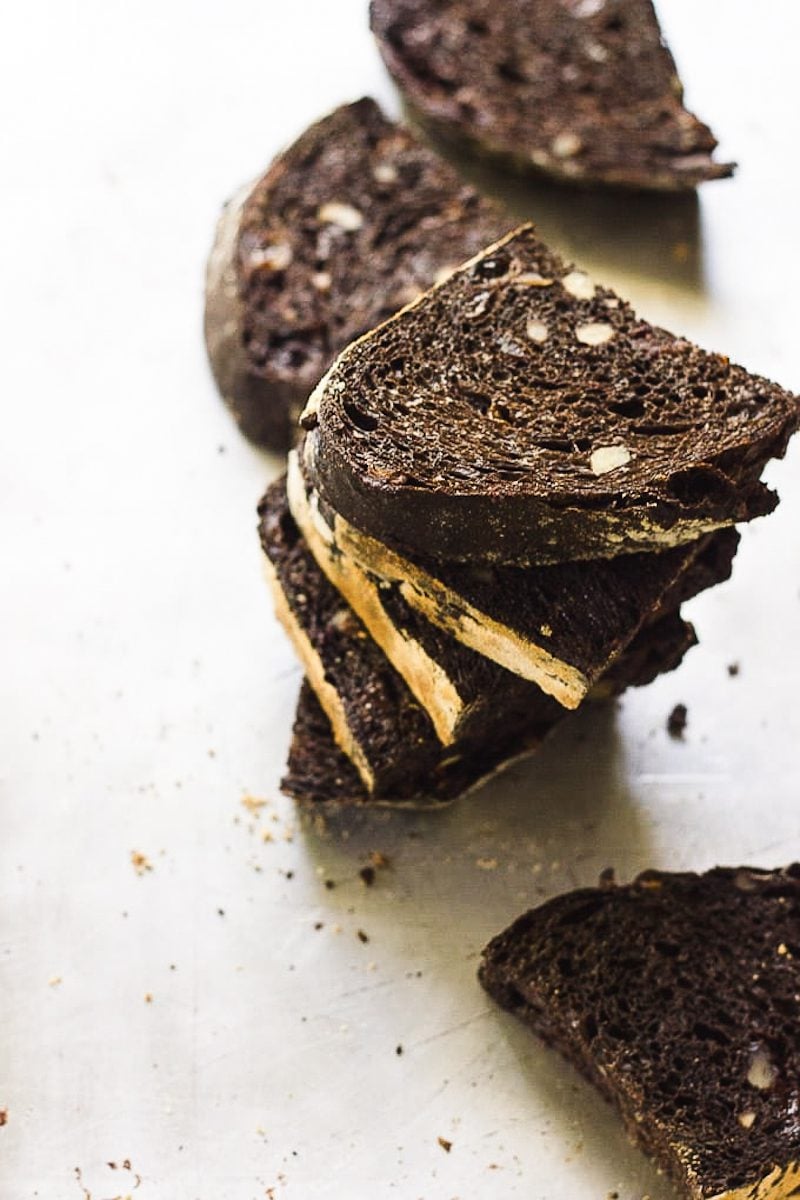
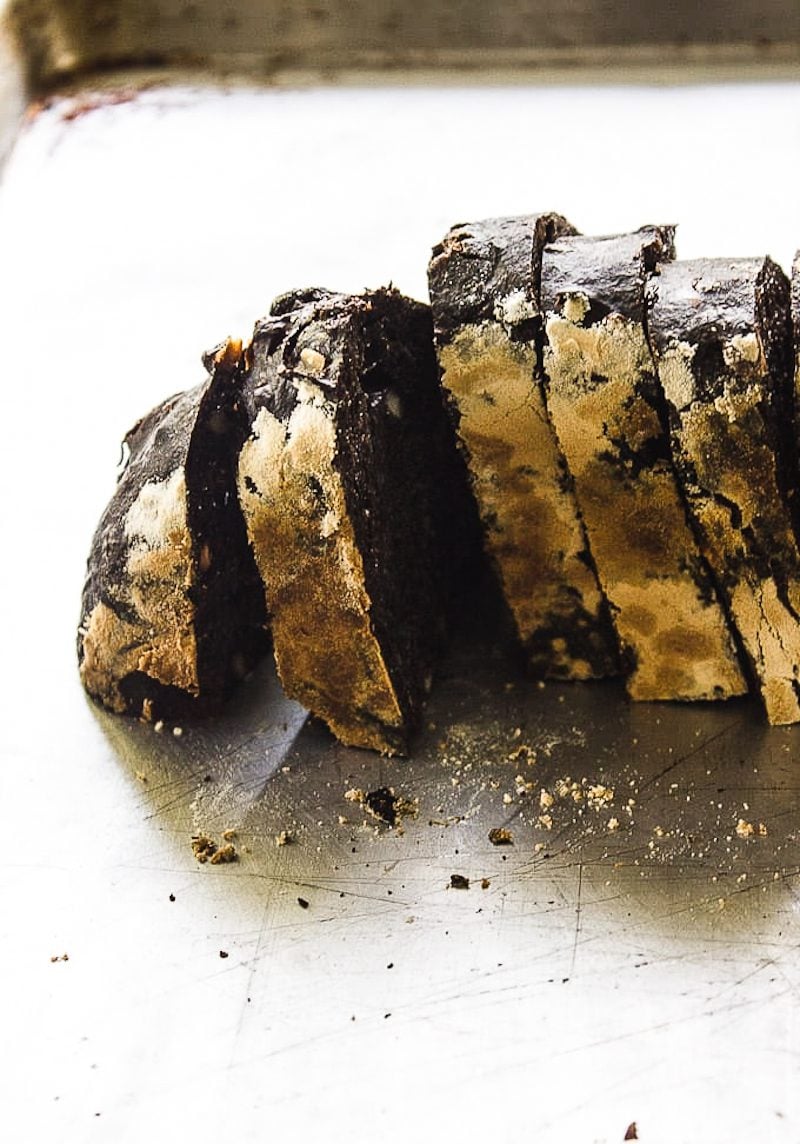
Adapted from my beginner sourdough bread recipe, this unique chocolate sourdough loaf is packed with rich chocolate chips, crunchy walnuts and vanilla-soaked raisins (soft and chewy too!). I wrote this recipe years ago, and to this day it’s still one of the most popular sourdough bread recipes on my blog!
For variety, I highly recommend you try the peanut butter almond version too, which you can find in my book Artisan Sourdough Made Simple. I love leftover slices, toasted, with pats of salted creamy butter.

It Took 3 Tries To Get This Recipe Right.
Round #1: Cocoa Powder
To make chocolate sourdough bread, I initially assumed adding cocoa powder to the dough would make it taste like chocolate cake. It didn’t. Although the texture was nice, the final product wasn’t chocolatey at all. It needed something…
Round #2: Chopped Chocolate Chunks
To elevate that chocolate flavor, I added chunks of good-quality bar chocolate to the dough. You know what happened? It melted into the dough. Unlike chocolate chips from the bag (think: Nestle semi-sweet morsels), most chocolate bars do not contain stabilizers to keep them from melting. It added too much fat to the dough. This round was a fail (but mental note for Round# 3).
Round #3: Chocolate Chips, Dried Fruit + Nuts
In this final version, my base dough included cocoa powder for color and richness. But the addition of chocolate chips meant chocolate in every bite while dried fruit and nuts made it texturally interesting (at least to me anyway). I used a combination of raisins which I soaked in vanilla and chopped walnuts. Dried cherries or hazelnuts would be fantastic, too.

How to Make Chocolate Sourdough Bread
Ingredients you will need:
- Active Sourdough Starter
- Water
- Sugar (vanilla sugar is nice)
- Vanilla extract or vanilla bean
- Bread flour
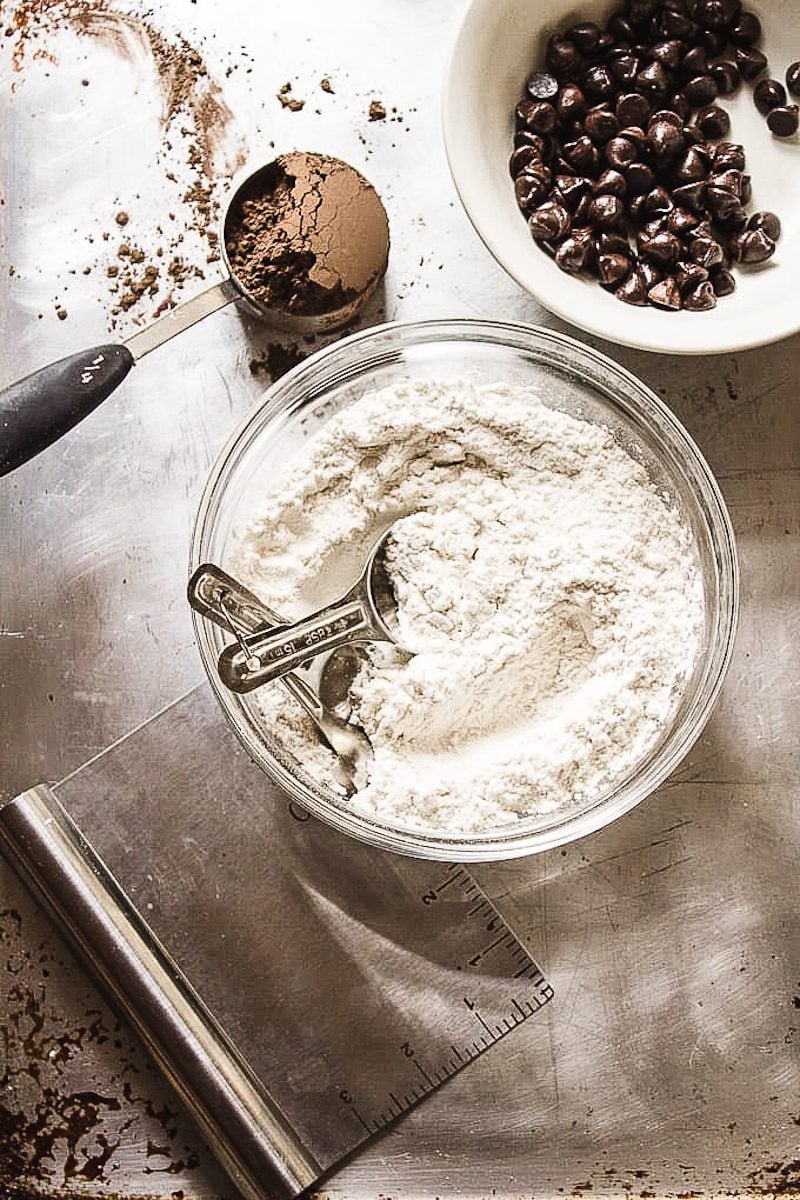
- Cocoa powder
- Walnuts
- Raisins
- Chocolate Chips
- Powdered sugar, for decoration
Method at a glance:
- Mix dough by hand
- Let dough rest for 1 hour (autolyse)
- Salt and fillings added after autolyse
- Stretch and fold every 30 minutes for 2 hours during the bulk rise
- Bulk rise at room temperature (currently 65 F here) overnight, about 12-14 hours
- Second rise approximately 45 minutes- 1 hour
- Bake in Dutch oven at 400 F for 20 minutes (covered) + 40 minutes (uncovered)
A Few Tips:
- Weigh your ingredients. A digital scale for accuracy is a must in bread baking. Alternatively, if using measuring cups please lightly spoon and level your flour.
- Chocolate dough is stiff. The cocoa powder tightens up the texture of the dough- this is normal. Give it more time to rise, in a warm spot, as needed.
- Use a Dutch oven or Bread Pan. Steam is essential for a lofty high rise and artisan crust. The easiest and most reliable way to create steam is choosing a baking vessel with a lid.

Chocolate Sourdough Noir
- Prep Time: 10
- Cook Time: 1 hour
- Total Time: 1 hour 10 minutes
- Yield: 1 Loaf
- Category: Sourdough Bread Recipes
- Method: Oven-Baked
- Cuisine: American
- Diet: Vegetarian
Description
This chocolate sourdough bread recipe ticks all the boxes: soft, chewy and full of incredible chocolate flavor! It uses active sourdough starter to naturally leaven the dough, which comes together by hand in under 10 minutes.
Ingredients
- 150g bubbly, active sourdough starter
- 350g water, preferably filtered
- 50g sugar (vanilla sugar is nice)
- 1 tsp. vanilla extract or 1 vanilla pod, seeds scraped
- 500g bread flour
- 50g cocoa powder*
- 9g fine sea salt
- 65g chopped walnuts
- 65g raisins
- 150g semi sweet chocolate chips
- powdered sugar for decoration
* I used Hershey’s Special Dark, a blend of natural and Dutch process cocoas
** You will need a 6 quart Dutch oven for baking
Instructions
Make the Dough
In a large bowl combine the starter, water, sugar and vanilla. Stir with a fork. Sift the bread flour and cocoa powder together and add to the bowl. Squish everything together with your hands until all of the flour is absorbed. Cover with plastic wrap and let it rest (autolyse) for 1 hour. Note: use this time to soak the raisins in a splash of vanilla extract for extra flavor (optional). Drain and pat dry before using.
To the dough: Add the salt, walnuts, raisins and chocolate chips. Lift and fold the dough over itself several times and squish with your hands to incorporate. The dough will tear slightly as you fold. Don’t worry- this is normal. Work the dough as best you can until it comes back together into a rough ball.
Bulk Rise
Cover the bowl with plastic wrap and a clean kitchen towel. Leave it in a warm spot to rise. Your dough is ready when it no longer looks dense and has increased in volume about 1½- 2x its original size. This can take anywhere from 10 hrs @ 68 F; 5-6 hrs @ 75 F; 3-4 hrs @ 80 F depending on the temperature of your ingredients, the potency of your starter and surrounding environment (**see notes below). Optional Step: about 30 minutes into the start of the bulk rise, you can stretch and fold the dough.
Stretch & fold: To strengthen your dough, do a series of stretch and folds every 30 minutes for the first 2 hours of bulk fermentation. Simply gather a portion of the dough, stretch it upwards and then fold it over itself. Rotate the bowl ¼ turn and repeat until you have come full circle. You will have completed 4 folds. Try to keep the fillings tucked into the dough and not on the outside. This will prevent burning when baked.
Shape the Dough
To cut and shape the dough, divide your work surface in half; lightly flour one side (for cutting) and leave the other half clean (for shaping). Remove the dough from the bowl and place onto the floured section. You do not need to ‘punch down’ the dough; it will gently deflate as you fold and shape it. Cut the dough in half to make 2 loaves, or leave it whole for a single loaf. To shape, use a bench scraper to move your dough to the non-floured section (if there is any flour present it will be difficult to shape- brush away any excess). Gather the dough, one side at a time, and fold it into the center. Flip the dough over and place it seam side down. Using your hands, gently cup the sides of the dough and rotate it using quarter turns in a circular motion. You can also pull it towards you to even out its shape. Repeat this process until you are happy with its appearance.
Second Rise
Place the dough into a cloth lined 8-inch bowl or floured/lined proofing basket. It will need to rise again, about 30 minutes to 1 hour. It is ready when the dough is slightly puffy, but not double in size.
Towards the end of the second rise preheat your oven to 400 F. Cut a sheet of non-stick parchment paper to fit the size of your baking pot, leaving enough excess around the sides to remove the bread.
Score the Dough
Place the parchment over the dough and invert the bowl to release. Using the tip of a bread lame, small, serrated knife or a razor blade, make four shallow 4-inch long cuts at 3, 6, 9, and 12 o’clock around the dough. Use the parchment paper to transfer the dough to the baking pot.
Bake the Dough
Place your bread into the oven (lid on) and bake for 20 minutes. Remove the lid, and continue to bake (uncovered) for an additional 40 minutes. During the last 10 minutes of baking, crack open the oven door. This allows the moisture to escape, leaving your bread with a crisp crust. You can also take the internal temperature of your bread to double check that it is done. For sourdough, it should read about 205 F.
Cool
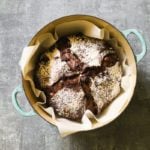
Remove the bread from the oven, and cool on a wire rack for at least an hour before slicing. Dust with powdered sugar before serving.
Notes
Because sourdough does not contain commercial yeast, it takes considerably longer to rise. In the summer months, it can take anywhere between 3-4 hours @ 85 F whereas in the winter, about 8-12+ hours @ 65 F. In the winter, I make my dough in the afternoon and leave it to rise overnight at room temperature. In the warmer months, I bulk ferment in the fridge to slow down the rise time.

Comments
ANN MIERS says
Hi there, I have baked through your book and everything‘s been awesome. I’m just curious how to make my higher hydration have more holes in the crumb? Is that more folding?
Also, I throw everything in the refrigerator for a second rise. Could that be an issue? Including the peanut butter chocolate bread…….
Thanks so much!
Ann
Jenna Barnhill says
A new favorite! The flavor is incredible and not to sweet. I left out the raisins just because I don’t like them and I did not substitute with anything else. A slice of this would pair perfectly with a cup of coffee!
Personally, I feel like the dough took a little longer to bulk ferment with the inclusions. It took mine about 8 hours at 78-80 degrees (F) ambient temperature. The dough was around 79-80 degrees (F) every time I checked.
I split the dough in half after bulk ferment. I shaped, rested, and then baked one loaf while the other one was shaped and then put in the fridge to bake later.
I did NOT preheat my Dutch oven while preheating my oven and I put a baking sheet on the rack directly below the one I was baking on, I feel like doing these things helped the bottom not to burn or get too hard.
For the smaller loaves, I baked at 400F with the lid on for 20 minutes, then with the lid off for 30 minutes. I did not leave the oven cracked during the last 10 minutes as I did not want a super crisp crust. These baking times put my loaf right at 205 degrees (F).
10/10!
Kristen Boivin says
Amazing! Left out the raisins though.